DIY wedding favor plants are a perfect addition to any creative themed, spring inspired, or even “green” conscious wedding. The tutorial I bring you today happens to be the wedding favors featured in my very own Magic Gardens Wedding.
While researching my red and aqua themed wedding, I decided miniature potted plants would be the perfect gift for my guests to take home with them to remember my magical event. At first I thought of purchasing the pots, but had a hard time finding ones unique enough for my taste, so I decided to get creative and produce them myself.
I never made anything like this before and was a bit scared to take on such a project, especially a few months before the wedding, but found the experience to be quite peaceful and a much needed break from the day to day wedding planning.
DIY Wedding Favor Plants Materials Needed
- Miniature terracotta pots
- Spray paint
- Tile cutter Hammer
- Broken tiles, broken plates, broken mirrors, beads, gems, or any other material you would like to incorporate into the pot
- Super Glue or Gorilla Glue
- Pre mixed tile grout
- Sponge brush
- Regular kitchen sponge or Clorox bleach wipes
- Rubber gloves (optional)
Step 1: Painting Terracotta Pots
I had 75 guests at my wedding and probably could have gotten away with making half that amount in diy wedding favor plants, but being as ambitious as I am, I made 75 pots. I found these terracotta ones at AC Moore and waited for them to go on sale for 50% off, so they were about 50 cents a piece.
The fastest and easiest way is to spray paint the pots. Just a friendly warning: if you are going to paint them this way, please make sure you do it outside. These fumes can be unbearable, spraying inside the house can be dangerous and hazardous to your health. For my project, I chose to spray paint some red and some aqua. I threw a few white ones in there too. Please allow them to dry at least 6 hours before moving on to step 2.
Step 2: Gluing the Tiles
This step is by far the most time consuming. I realized this early on and coaxed my friends and family, mostly with wine, to come over and have a girls night to help glue these suckers to the pots. Everyone enjoyed their arts and crafts time and it was also a great way to bond and connect during the stressful months leading up to the wedding.
I also took a short cut with this step. Instead of finding old plates and tiles to break, I purchased pre-cut ones from various Etsy shops. It was the easiest way for me to find colors and patterns that fit my red and aqua theme. This cut back on time as well. I still had to use the tile cutters though, for bigger pieces or if I wanted to change the shape of any pre existing pieces.
Put a dab of gorilla glue on the back of each tile and assemble it on the spray painted pot, not in any particular pattern. Some pieces you may have to hold for 10-20 seconds to make sure they really stick. Be careful not to glue your finger to the pot or to a tile. As funny as this sounds it happens! We had tiles stuck to the table, our fingers, and weeks later, I even found one glued to my hooded sweatshirt! Allow a few hours to dry on this step as well. You want to make sure the tiles will not budge.
Step 3: Grouting
This step is where the rubber gloves come in. Notice I’m not wearing any because I felt the grout was much easier to work with without them. This cost me a manicure and a trip to the jeweler to get my gorgeous engagement ring de-grouted. The choice is yours. I bought pre-mixed grout in the tile section of the hardware store, in my case Home Depot. Grout comes in a variety of colors, light and dark, but I chose the lightest because I really wanted my tiles to stand out. I did this step at the sink because of the mess it makes.
For the application, push the grout in between each tile covering the entire surface. Notice I went right over the tiles. This can be easily cleaned off, the main goal is the get coverage around the entire pot.
Step 4: Final Polish
After you allowed time for the grout to set, you will need to scrub off any excess residue left from the application process. You could use the rough pad of a regular kitchen sponge or Clorox kitchen wipes. I found they worked best. Either one will get the job done. See – all shiny and clean! Now you are ready to pot your plants!
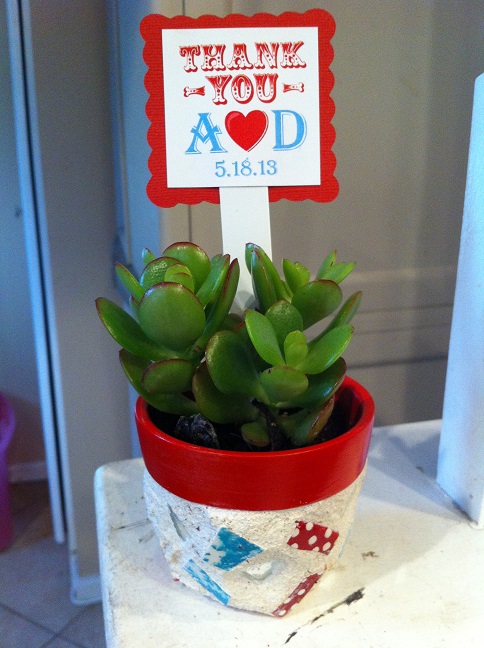
Step 5: Add Plants and Signage
It’s potting time! I chose succulents for my DIY wedding favor plants project because they are easy to take care of and come in all shapes and sizes. I ordered my plants from a wonderful store on Etsy called WoogiesPlace. They had an amazing selection of plants and were beyond helpful throughout all my indecisive moments. The plants arrived in tiny holders where there were easily transplanted, with a little added soil, into my newly creative pots. I finished off my diy wedding favor plants with a plastic garden stake glued to a wedding sign designed by my husband Derek.